Frontend SDK
Hokodo provides a frontend SDK that gives you two UI components out of the box:
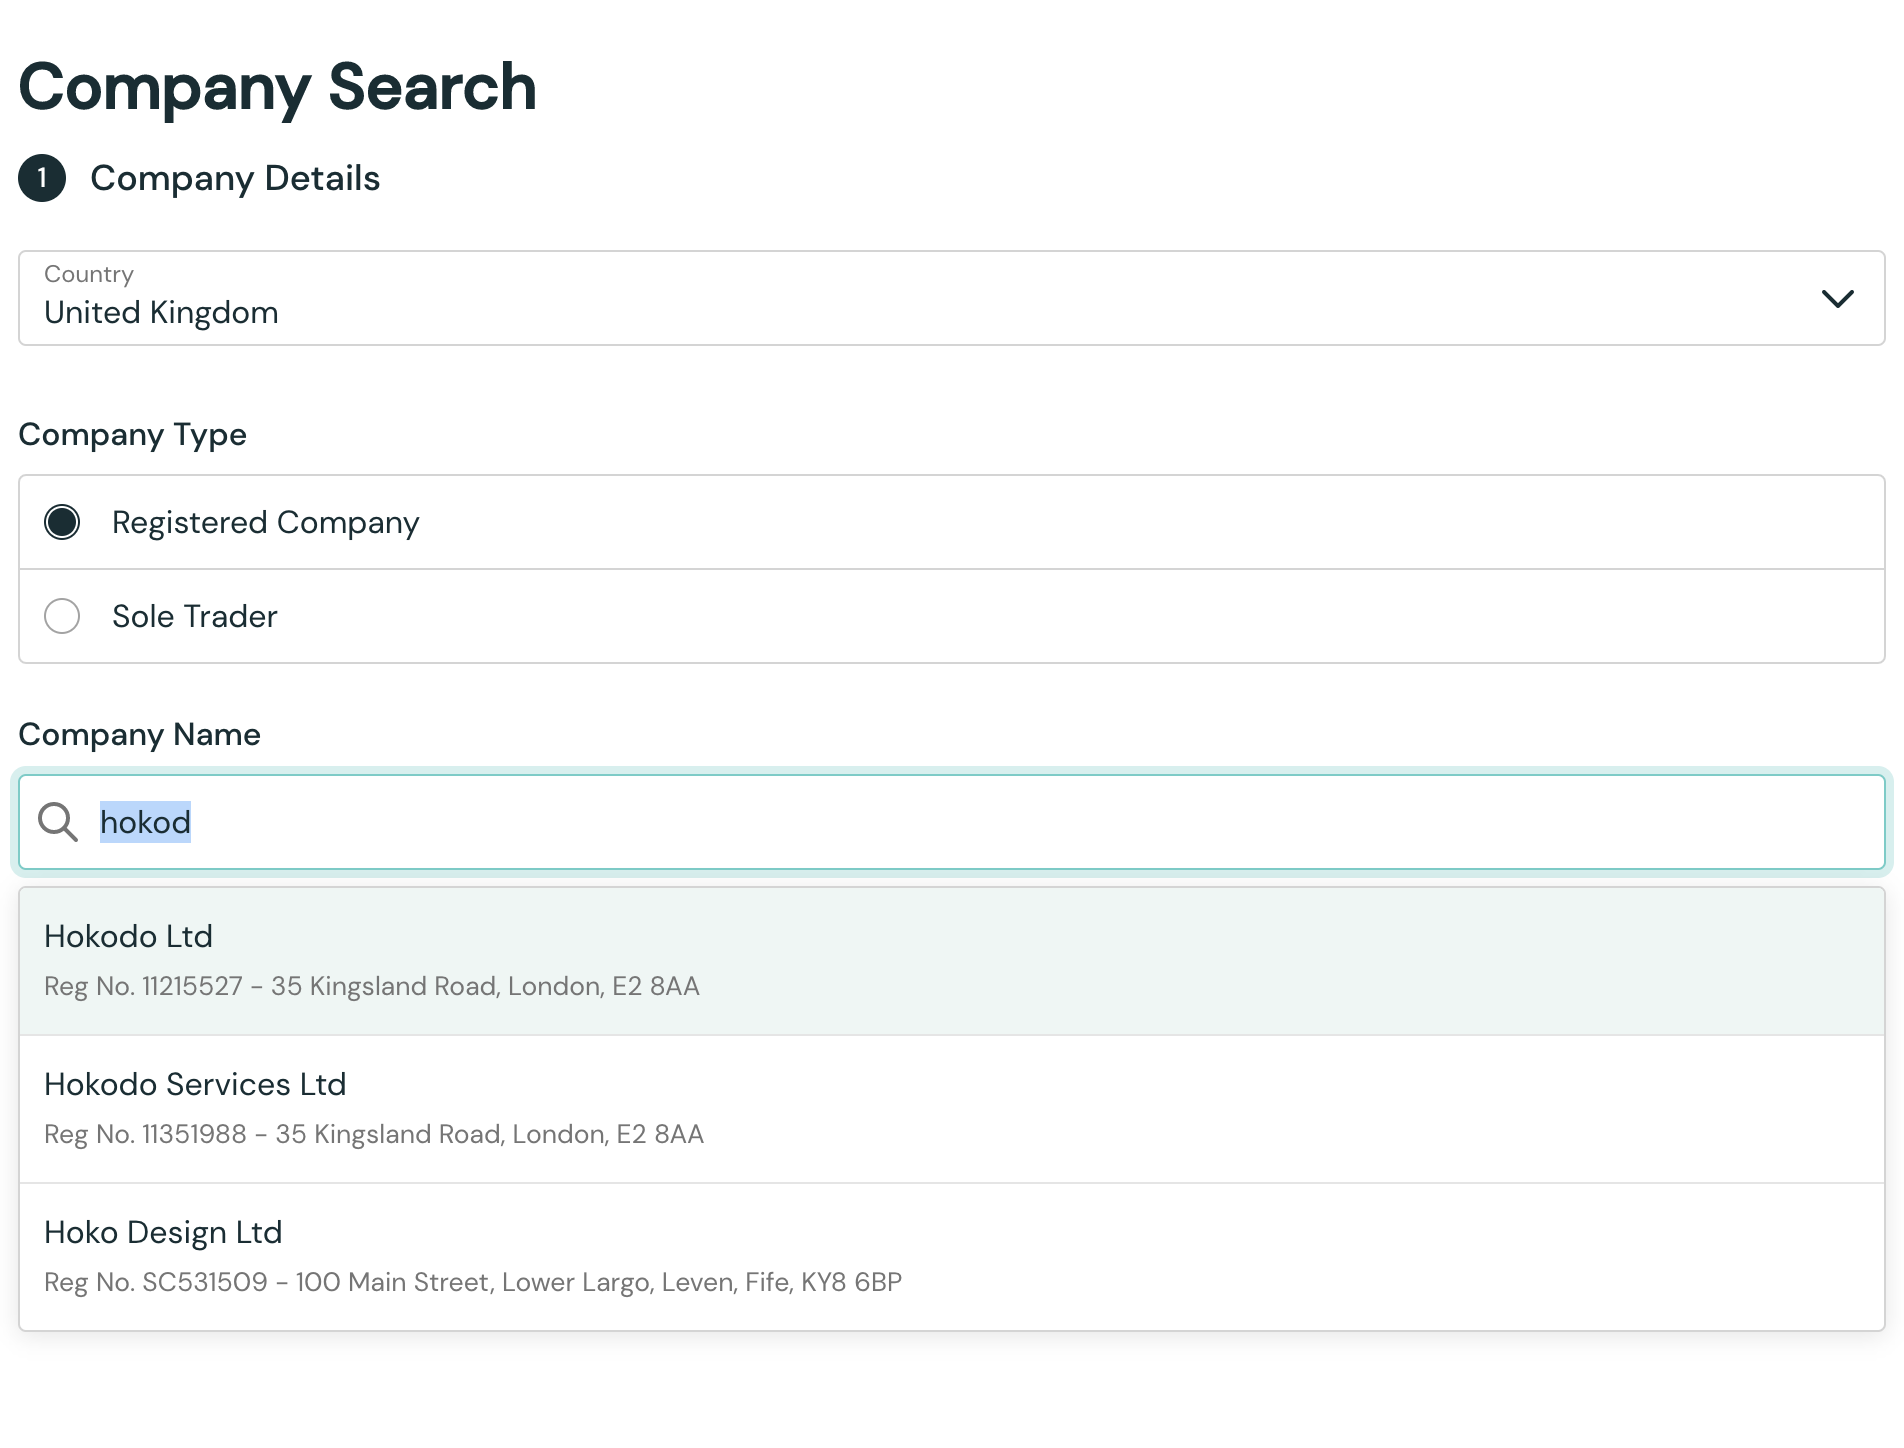
SDK Company Search element
The Company Search element finds the buyer's company based on a company name entered as free-text.
For sole traders, the buyer also the company's address and the owner's personal name, date-of-birth, and address.
The SDK handles the API interaction for Company Search for you.
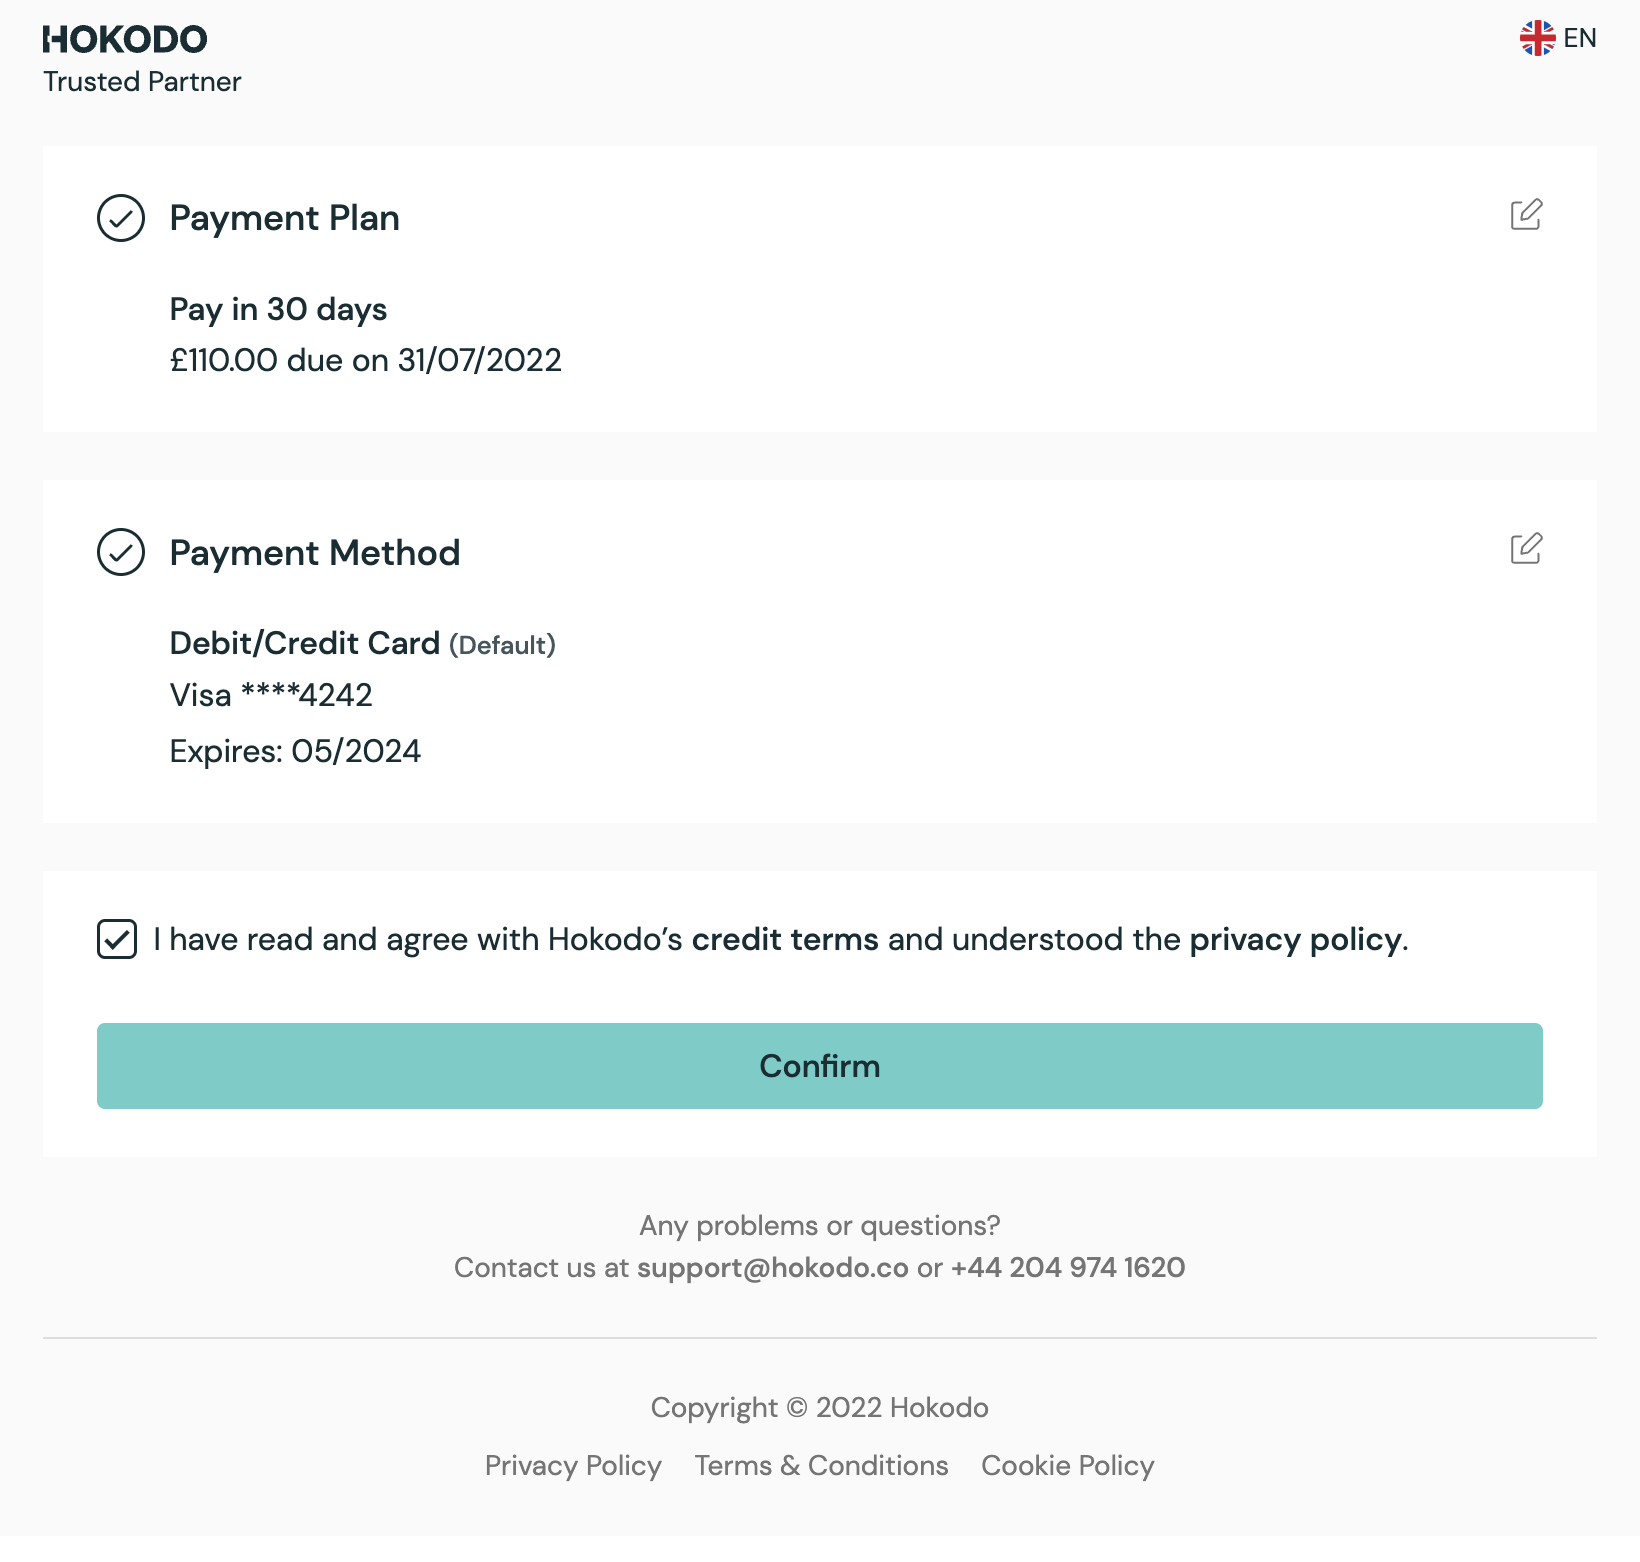
SDK Checkout
The Checkout element is a complete payment form, including:
- Embedded payment plan selection, to let the buyer choose between multiple payment terms
- Embedded payment method selection, to let the buyer use their preferred method.
Setting up the SDK
To get these elements onto the page, you need to:
Initialising the SDK
Follow these steps to get the Hokodo SDK as a JavaScript object on your page.
Include the Hokodo SDK in your page
Include the Hokodo script on pages where you wish to access the SDK. It should always be loaded directly from
https://js.hokodo.co or js-sandbox.hokodo.co/hokodo-js/v1/, rather than being included in a bundle or hosted yourself.
<!--Sandbox URL for use whilst developing-->
<script src="https://js-sandbox.hokodo.co/hokodo-js/v1" />

<!--Production URL-->
<script src="https://js.hokodo.co/hokodo-js/v1" />
The script tag should be part of your initial DOM structure rather than added dynamically via JavaScript, as dynamically added script tags can be blocked by ad blockers since they're viewed as third-party scripts at that point.
When using async or defer tags, any SDK methods must only be executed after the script has finished loading.
You'll need to account for this in your code if you use these attributes.
You will now have an object named Hokodo in the global scope:
window.Hokodo;
// or
Hokodo;
Instantiate the SDK object with your Public Key
Pass your SDK Public Token into the Hokodo object to instantiate it:
const hokodo = Hokodo("pk_test_xxxx");
The elements provided by the SDK are now available as hokodo.elements:
const elements = hokodo.elements();
Content security policy
If you deploy a content security policy, you will need to add the following in order to fully support Hokodo's frontend SDK:
For Sandbox
connect-srchttps://js-sandbox.hokodo.co, https://i-pay-sandbox.hokodo.coframe-srchttps://js-sandbox.hokodo.co, https://i-pay-sandbox.hokodo.coscript-srchttps://js-sandbox.hokodo.cofont-srchttps://fonts.gstatic.comstyle-srchttps://fonts.googleapis.com
For Production
connect-srchttps://js.hokodo.co, https://i-pay.hokodo.coframe-srchttps://js.hokodo.co, https://i-pay.hokodo.coscript-srchttps://js.hokodo.cofont-srchttps://fonts.gstatic.comstyle-srchttps://fonts.googleapis.com
Creating the SDK Elements
Once you have the elements object in scope, there are two stages to getting either the Company Search or the Checkout onto the page. First, you instantiate the object in memory. Then, you mount it onto the page (i.e. into the DOM).
Company Search
Use the elements object to instantiate a companySearch object:
// Instantiate a companySearch element
const companySearch = elements.create("companySearch", {
  companyId: "co-Fxg554ndIQzI2v347DoOBm", // optional
  country: "GB", // optional
  countryOptions: ["GB", "ES", "FR", "DE", "NL", "BE"], // optional
});
Then use its mount() method, passing in a CSS selector for an element you wish to attach it to:
// In your HTML
<div id="hokodoCompanySearch"></div>;

// In your JS
companySearch.mount("#hokodoCompanySearch");
Checkout
Use the elements object to instantiate a checkout object:
// Create Checkout element with payment offer
const checkout = elements.create("checkout", {"paymentOffer": ..., "paymentPlanId": ...});

// OR

// Create Checkout element with payment intent
const checkout = elements.create("checkout", {"intent": ...});
If you're implmenting the standard API flow, the paymentOffer and paymentPlanId (optional) are obtained by fetching the Payment Offers for an Order, see
Step 2a of the integration guide for details on how to obtain these.
Otherwise, for the new simplified integration, the intent object is obtained from the the POST /v1/payment/intents request.
In your implementation, you should store the paymentOffer or intent object as a variable when you make the relevant request.
| Key | Value |
|---|---|
intent | This is the object returned from the /payment/intents endpoint (see Simplified API workflow).Note: This is not required if you are going to pass the paymentOffer directly. |
paymentOffer | This is the object returned from the /payment/offers endpoint (see API Reference). |
paymentPlanId (optional) | The ID [string] of the payment plan you wish to select for the buyer, e.g. "ppln-EWjykhvDNWydKUfeJQyoM4". If used, the list of available payment plans will be replaced by a single pre-selected plan.Note: This is a useful option if you have the ability to select a payment plan within your application. You can use the update method to inform the Checkout Element when the user selects a different plan.Use this option if you are not using the payment intent API workflow. |
headless (optional) | The headless [boolean] option allows you to integrate the payment page in the headless mode that renders no UI. Note that this option is only available to select merchants and requires the paymentPlanId to also be passed. Moreover, Invoice is the only payment method in headless mode. More details about the headless mode can be found here. |
buttonlessSubmission (optional) | With the buttonlessSubmission [boolean] option, the checkout element will not display the button to submit the order. Instead, you will have to call the confirmOrder method as a final step for order submission. This is useful if you want to use your existing order submission button on your checkout page. |
hidePaymentPlanName (optional) | hidePaymentPlanName [boolean] provides the ability to hide the payment plan name from the buyer interface, displaying only the payment timeline. Only enable this option if you are accurately presenting the payment plan name along with associated fees and discounts on your page. Note: You would also need to pass a paymentPlanId to enable this option. |
When integrating the checkout element, you must choose between passing a paymentOffer for the standard API workflow or an intent for the single API call workflow. Do not pass both to ensure a seamless integration process.
Expand the blue boxes below to see a full examples:
Detailed Checkout Creation Example with Payment Offer
In your implementation, you should store the paymentOffer object as
a variable when you make the POST /v1/payment/offers call. For the sake of this example, we have replaced it with a literal.
const checkout = elements.create("checkout", {
  paymentPlanId: "ppln-EWjykhvDNWydKUfeJQyoM4",
  paymentOffer: {
    url: "https://api.hokodo.co/v1/payment/offers/offr-vyR4AFXGJWZz8XDgXoWVtZ",
    id: "offr-vyR4AFXGJWZz8XDgXoWVtZ",
    order: "order-YrG5y79iuxTTEpkzPbaqcX",
    offered_payment_plans: [
      {
        id: "ppln-G4d57Dkmrgbh2HHbhhv89n",
        name: "Pay in 3x",
        template: "pptemp-tq28UahiUe49cDb4knmf4U",
        currency: "GBP",
        scheduled_payments: [
          {
            date: "2022-05-09",
            amount: 102000,
            allowed_payment_methods: [
              {
                type: "direct_debit",
              },
              {
                type: "invoice",
              },
              {
                type: "card",
              },
            ],
          },
          {
            date: "2022-06-08",
            amount: 99000,
            allowed_payment_methods: [
              {
                type: "direct_debit",
              },
              {
                type: "invoice",
              },
              {
                type: "card",
              },
            ],
          },
          {
            date: "2022-07-08",
            amount: 99000,
            allowed_payment_methods: [
              {
                type: "direct_debit",
              },
              {
                type: "invoice",
              },
              {
                type: "card",
              },
            ],
          },
        ],
        merchant_fee: {
          currency: "GBP",
          amount: 9000,
        },
        customer_fee: {
          currency: "GBP",
          amount: 0,
        },
        valid_until: "2027-05-08T14:52:30.698Z",
        payment_url:
          "https://pay.hokodo.co/?order=order-YrG5y79iuxTTEpkzPbaqcX&plan=ppln-G4d57Dkmrgbh2HHbhhv89n&key=AnPbAFHxtmt6cAvMvATbPqxhfCGGqc3-kA84RWIb1vg&template=pptemp-tq28UahiUe49cDb4knmf4U",
        status: "declined",
        rejection_reason: {
          code: "buyer-country",
          detail:
            "We're currently unable to provide payment plans to Buyers domiciled in {debtor_country}.",
          params: {
            debtor_country: "Japan",
          },
        },
      },
      {
        id: "ppln-EWjykhvDNWydKUfeJQyoM4",
        name: "Pay in 30 days",
        template: "pptemp-28L6wQ66UCguEiGFqwfHjM",
        currency: "GBP",
        scheduled_payments: [
          {
            date: "2022-06-08",
            amount: 300000,
            allowed_payment_methods: [
              {
                type: "direct_debit",
              },
              {
                type: "invoice",
              },
              {
                type: "card",
              },
            ],
          },
        ],
        merchant_fee: {
          currency: "GBP",
          amount: 9000,
        },
        customer_fee: {
          currency: "GBP",
          amount: 0,
        },
        valid_until: "2027-05-08T14:52:30.902Z",
        payment_url:
          "https://pay.hokodo.co/?order=order-YrG5y79iuxTTEpkzPbaqcX&plan=ppln-EWjykhvDNWydKUfeJQyoM4&key=AnPbAFHxtmt6cAvMvATbPqxhfCGGqc3-kA84RWIb1vg&template=pptemp-28L6wQ66UCguEiGFqwfHjM",
        status: "declined",
        rejection_reason: {
          code: "buyer-country",
          detail:
            "We're currently unable to provide payment plans to Buyers domiciled in {debtor_country}.",
          params: {
            debtor_country: "Japan",
          },
        },
      },
    ],
    legals: {
      type: "a",
      terms_url: "https://static.hokodo.co/payments/a_v1.0/a_v1.0_gb.pdf",
    },
    urls: {
      success: "",
      failure: "",
      cancel: "",
      notification: "",
      merchant_terms: "",
    },
    locale: "en-gb",
  },
});
Detailed Checkout Creation Example with Payment Intent
In your implementation, you should store the intent object as
a variable when you make the POST /v1/payment/intents call. For the sake of this example, we have replaced it with a literal.
const checkout = elements.create("checkout", {
  intent: {
    id: "intent-pn5vmdgxjs5WXQ98o6gyBH",
    payment_url:
      "https://pay-dev.hokodo.co/?intent=intent-pn5vmdgxjs5WXQ98o6gyBH&key=0mRR45rtXHY2cim1eBd3b5ve3Cx4p5HS6UdN6gDh2Qg",
    order: "order-Q7HEz6f8CiLfZi8j7iUQZQ",
    created: "2024-02-01T17:37:43.172271Z",
    request: {
      order: {
        customer: {
          user: {
            email: "john.doe@email.com",
            name: "John Smith",
            phone: "07969746763",
            registered: "2023-12-05",
          },
          invoice_address: {
            name: "Invo Smith",
            address_line1: "1 Invoice Street",
            town: "London",
            postcode: "TN12 9GL",
            country: "GB",
          },
          delivery_address: {
            name: "Deli Smith",
            address_line1: "1 Delivery Street",
            postcode: "TN12 9HU",
            country: "GB",
          },
        },
        unique_id: "223",
        currency: "GBP",
        total_amount: 19999,
        items: [
          {
            item_id: "1",
            type: "product",
            description: "Super ergonomic chair",
            metadata: {
              color: "black",
              name: "Karmus",
              variant: "M",
            },
            reference: "702.611.50",
            category: "Furniture > Chairs",
            supplier_id: "7363",
            quantity: 1,
            unit_price: 19999,
            tax_rate: "0",
            total_amount: 19999,
            tax_amount: 0,
          },
        ],
      },
      merchant_urls: {
        success: "https://merchant.com/payment/success",
        failure: "https://merchant.com/checkout",
        cancel: "https://merchant.com/checkout",
        notification: "https://backend.merchant.com/payment/notifications",
      },
      locale: "en-gb",
    },
  },
});
Now you can mount the Checkout Element on the page:
// In your HTML
<div id="hokodoCheckout"></div>;

// In your JS
checkout.mount("#hokodoCheckout");
Putting the event listeners after the mount may cause issues as the events will not be binded
Events
Both SDK elements have several .on() events that allow for communication between the element and your application. See below for tables of event names and descriptions of their behaviour for each element.
To register an event handler, pass the event name to the .on method, along with a function to call when the event is triggered.
companySearch.on(event, handler);
We recommended creating these events before running .mount to ensure they are triggered correctly.
// Register some basic event handlers
companySearch.on("ready", () => {
  alert("ready!");
});
companySearch.on("countryInputChange", (country) => {
  alert(country);
});
// Then mount the companySearch element
companySearch.mount("#hokodoCompanySearch");
Company Search
Here are the events supported by the Company Search Element.
The companySelection event may be of particular interest if you need to access the Hokodo Company ID (co-xxxx) in
your code.
| Event name | Description |
|---|---|
ready | When the element has fully loaded after .mount has been called |
failure | When there has been a fatal error when loading the element |
countryInputChange | On change of the country input (this is a <select> input), returning the selected country value |
companyTypeInputChange | On change of the company type input, returning the selected company type value ("registered-company" or "sole-trader"). |
companySelection | When the user selects a company. The object returned will be a Company or Sole Trader object, or null if no company is selected. The object will have an extra field called type, giving the selected company type (either registered-company or sole-trader). |
Checkout
Here are the events supported by the Checkout Element. These are used to plug the Hokodo Checkout Element into your overall checkout flow, so binding handlers to these events is required to complete the integration.
| Event name | Description |
|---|---|
ready | When the element has fully loaded post mount method execution. |
success | On successful submission of Hokodo as the payment method. |
failure | When there has been a fatal error when loading the element. |
rejected | When the company has not been approved for any payment offers. |
formState | When Hokodo checkout submission status changes. The payload contains a boolean isReadyToSubmit flag that allows you to decide when to show and hide the order submission button on your page. This is only available with buttonlessSubmission option. |
Methods
Company Search
The Company Search Element provides these methods:
| Method | Description |
|---|---|
.mount | This method mounts the company search element to the DOM. |
.unmount | This method unmounts the company search element from the DOM, while retaining the element in memory, along with all the associated .on events.This allows the calling of the .mount method again in the future, remounting the existing company search element within the desired target, with all the existing .on events. |
.destroy | Similar to .unmount, the .destroy method removes the element from the DOM but in addition removes all the .on event handlers and the element from memory.Once this method has been called the component will no longer exist in the DOM or in memory and you will need to recreate the element before events can be associated or it can be mounted again. |
.update | This provide the ability to pass any of the options (noted in the Creating the Company Search Element section) post .mount. The company search element will rerender to reflect any options that have been passed. |
Checkout
The Checkout Element provides these methods:
| Method | Description |
|---|---|
.mount | This method mounts the checkout element to the DOM. |
.unmount | This method unmounts the checkout element from the DOM, while retaining the element in memory, along with all the associated .on events.This allows the calling of the .mount method again in the future, remounting the existing company search element within the desired target, with all the existing .on events. |
.destroy | Similar to .unmount, the .destroy method removes the element from the DOM but in addition removes all the .on event handlers and the element from memory.Once this method has been called the component will no longer exist in the DOM or in memory and you will need to recreate the element before events can be associated or it can be mounted again. |
.update | This provide the ability to pass any of the options (noted in the Displaying the Checkout Element section) post .mount. The Checkout element will rerender to reflect any options that have been passed. |
.confirmOrder | This method provides the ability to trigger order confirmation programatically when using headless or buttonless submission mode. You can call this method from your existing confirm order button. More details about the headless mode can be found here. |
Accessing elements from memory
If you can no longer access the companySearch or checkout variables due to function encapsulation or for other reasons, you can get it back using the elements.getElement method:
const companySearch = elements.getElement("companySearch");
Headless payment page
Most of our merchants use Hokodo’s prebuilt UI for Buyers to complete the checkout process. However for some merchants, the large volume of Deferred Payments that are created per day per Buyer, and the fact that the payment terms and method are all pre-set, it makes more sense to use our headless SDK. Your Solutions Engineer will be able to advise you on this decision.
Headless mode allows you to integrate the checkout element without rendering any UI. This option is only available to select merchants who meet the following criteria:
- Hokodo is the only checkout option
- Buyers will be making many orders in a day
- Predetermined payment plan (credit terms)
- Invoice is the only payment method
We would also require you to add the following Hokodo legal text above the confirm order button:
By proceeding, you agree to be bound by Hokodo's payment terms and privacy policy.